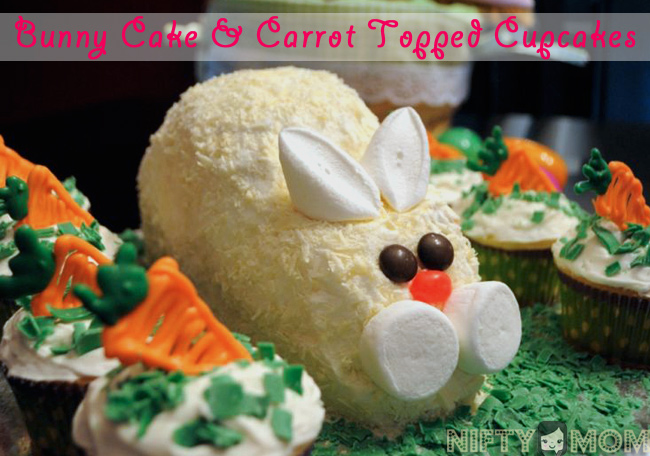
A couple years ago when I started Nifty Mom, one of the first posts I wrote was how to make an Easter Bunny Cake (which was adapted from this video I saw). The cake was a huge hit with family and friends plus it’s pretty simple to make. With Easter coming up, I have been thinking about the cake again. Since it was my first attempt at cake decorating and it lacked pictures, I decided to update the tutorial for you with step-by-step pictures and the addition of carrot topped cupcakes.
How to Make a Bunny Cake
What You Will Need:
- Circle Cake Pan
- 1 Box Cake Mix (plus ingredients to make per box)
- 2 Cans Vanilla Frosting
- 2 Squares of White Chocolate
- Vegetable Peeler
- 3 Large Marshmallows
- 1 Pink Jelly Bean
- 2 Brown M&Ms
Start by mixing the cake according to the directions on the box. Pour half the mix into a circle cake pan and the rest into 12 cupcakes. You can also use 2 cake pans just make 2 bunny cakes. Bake according to directions on the box. Cool and place the cake in the refrigerator for at least an hour (this reduces the crumble when cutting it). Set aside the cupcakes.
- Cut the cake in half.
- Ice the bottom of one half and stand the halves up, with the bottom/flat sides together. My cake was a little flatter than I would have liked, but the more puff your cake has, the fatter your bunny will be.
- Cut a notch out of the front top where the bunny ears are going to sit. You can see in my picture, I over cut so I iced a small piece of cake back on.
- Completely cover the cake with frosting.
- Make your squares of white chocolate into shavings using a veggie peeler.
- Lightly pan and sprinkle on the shavings on the entire cake.

- Slightly flatten one marshmallow and cut it diagonally. With the cut side facing forward, place them on the cut out notch for the ears. If the marshmallows don’t stick on, put a small amount of frosting on the bottom to hold them in place.
- Cut the other two marshmallows in half. One half will go in back for the tail and two halves on the front for the cheeks. Be sure to attach with the cut side, because it is sticking and will hold the marshmallows in place.
- Put the pink jelly bean and two M&Ms on the front to complete the bunny’s face. Again, use a small amount of frosting to hold them in place, if needed.
That is all you need to do for the bunny! You can serve it by itself, with another bunny, or with some cupcakes.
How to Make the Carrots for the Cupcakes
What You Will Need:
- Green Candy Melts
- Orange Candy Melts
- Baking Sheet
- Wax Paper
If you want to do the ‘grass’, melt a hand full of green candy melts in the microwave (30 seconds at a time, stirring each time until completely melted). I put a piece of wax paper in a microwave-safe container so I can just lift the wax paper out after it hardens. Place in the freezer for about 15-30 minutes to harden. Using the veggie peeler again to make shavings. Sprinkle on top of the cupcakes. If you are displaying the cupcakes with the bunny as I did, put the rest of the shavings around the bunny to look like he is sitting in grass.
- Melt a couple handfuls of orange candy melts in the microwave. I line a microwave-safe container with wax paper before I put the melts in.
- Place a Ziploc sandwich bag in a cup with the sides wrapped around it as shown above. This allows you to easily pour the melted candy into the bag.
- Remove the bag and snip a corner of the bag slightly. Don’t snip too much off or you will have too big of an tip/opening.
- Squeeze bag slowly to pipe carrots onto a wax paper-lined baking sheet. I always make way more than I need just in case some don’t turn out that well and I can pick my favorites.
- Melt a handful of the green candy melts, repeating the above steps to make the top of the carrots.
- Place baking sheet in the freezer for about 15 minutes to harden.
- The carrots should slide right off after they harden. Place them on the top of the cupcakes. You can lay the extras out around the base if desired.
Impress your friends & family and enjoy your creation!! If you have any questions, feel free to leave a comment.


